Installing electrical outlets can seem like a daunting task, but with the right tools and knowledge, you can do it safely and efficiently. This guide will walk you through the steps to install electrical outlets in your home, ensuring that you follow safety protocols and meet electrical codes.
Tools and Materials Needed
- Tools:
- Screwdriver (flat-head and Phillips)
- Wire stripper
- Voltage tester
- Drill and drill bits
- Fish tape (for running wires through walls)
- Materials:
- Electrical outlet
- Electrical box
- 12 or 14-gauge electrical wire (depending on your circuit)
- Wire nuts
- Electrical tape
Step-by-Step Installation Guide
Step 1: Turn Off the Power
Before beginning any electrical work, turn off the power at the circuit breaker. Use a voltage tester to confirm that the power is off at the location where you’ll be working.
Step 2: Choose the Location
Decide where you want to install the outlet. Consider accessibility and the need for power in that area. Use a stud finder to ensure you’re not drilling into a stud or pipe.
Step 3: Install the Electrical Box
- Cut a Hole: Use a drywall saw to cut a hole in the wall for the electrical box. The box should be flush with the wall surface.
- Mount the Box: Insert the electrical box into the hole and secure it using the provided screws or clamps.
Step 4: Run the Electrical Wire
- Determine Wire Length: Measure the length of wire needed to reach the nearest power source (such as an existing outlet or the circuit breaker).
- Use Fish Tape: If running wire through walls, use fish tape to pull the wire through the wall cavities. Ensure it follows the path of the existing wiring.
Step 5: Prepare the Wire
- Strip the Wire: Use a wire stripper to remove about 6-8 inches of insulation from the ends of the electrical wire, exposing the copper conductors.
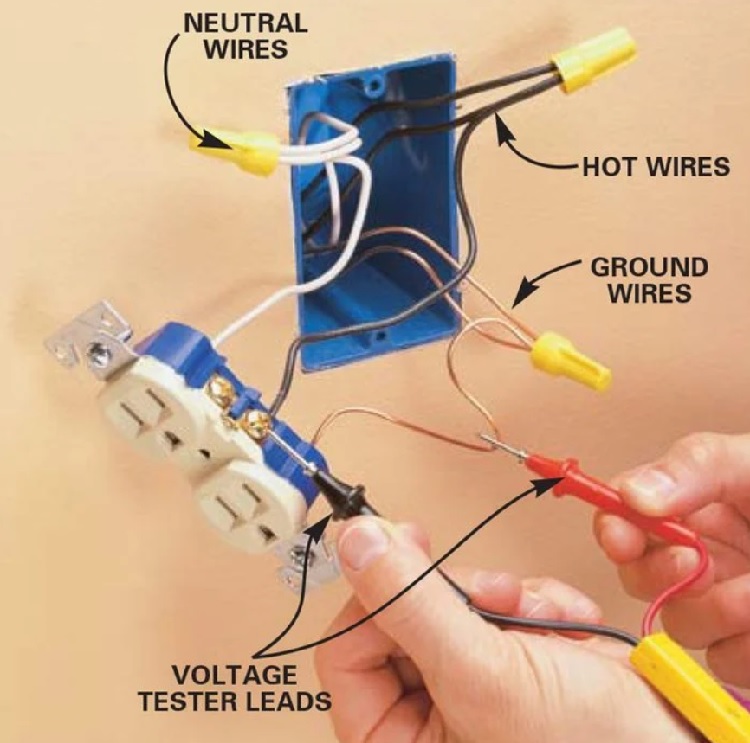
- Identify Wires: You should have a hot wire (usually black or red), a neutral wire (usually white), and a ground wire (bare copper or green).
Step 6: Connect the Wires to the Outlet
- Attach the Wires:
- Connect the hot wire to the brass terminal (usually marked “L” or “Hot”).
- Connect the neutral wire to the silver terminal (marked “N” or “Neutral”).
- Connect the ground wire to the green terminal.
- Secure the Connections: Use wire nuts to secure the connections, and wrap them in electrical tape for extra safety.
Step 7: Insert the Outlet into the Box
Carefully tuck the wires back into the electrical box and secure the outlet with screws. Ensure that it is flush with the wall.
Step 8: Cover the Outlet
Install a faceplate over the outlet to protect the connections and provide a finished look.
Step 9: Restore Power and Test
Once everything is installed, turn the power back on at the circuit breaker. Use a voltage tester to confirm that the outlet is working properly.
Safety Tips
- Always wear insulated gloves while working with electrical components.
- Ensure all connections are tight to prevent arcing.
- If unsure about any step, consult a licensed electrician.
- Follow local electrical codes and regulations for outlet installation.
Conclusion
Installing electrical outlets can be a rewarding DIY project when done safely and correctly. By following this step-by-step guide, you can enhance your home’s functionality while ensuring electrical safety. Always prioritize safety, and don’t hesitate to seek professional help when needed.